Showing posts with label crafting. Show all posts

Thursday, May 12, 2011

Shabby Chic Treasure Box

If you have a teenager at home, or a few spending the night. This is a super fun project to do. Or would make a wonderful gift to give to any new mommy. 


I found this plain wooden box at GW (Goodwill) for under $1.50 

Supply List:
Wooden Box (plain) 
Spray Paint
Finger Nail Polish
Mod Podge
Wooden Bead for knob or some other knob
Glue Gun
Fine grid sand paper

First, spray paint your box any color you would like. I used a light gloss of Ballet Slipper. Allow spray paint to almost dry.. where it's still a little tacky to the touch. Next I used a shimmer pink pearl finger nail polish and went over the corners and down the side, giving this box a feel of oldness. While that was drying. I took the wooden bead and put a layer of mod podge over it and covered it using the same tissue paper as the other prior projects. Allow this wooden bead to dry. 
I used a small bead of hot glue inside the frame and then laid my tiny pearls along this bead, go slowly as hot glue dries quickly. Once that is completed. I cut the tissue paper for the (see through door). I was lucky enough to find this box with a clear see through door on top that already had a plastic over lay. If you find a box with an open door, you can cut out a piece of card board, lay white printer paper over the card board and tape this white paper down. Then apply your tissue paper over the white paper. You can as well glue the white paper to the card board. I didn't glue my tissue paper down because later on, I might opt to change out the tissue paper. 

Hot glue your wooden bead on for the knob and seal this with clear finger nail polish or a fine thin coat of Mod Podge. Add your accessories to the top and complete with a bow. 

I spray painted the entire box inside and out. So if you opt to do this, you must allow everything to dry fully before you proceed to the next steps. After everything has been allowed to dry fully. Take your fine grid sand paper and go over the sides and corners on top, giving an old appearance and worn effect. 

This box would look really adorable on any dresser, filled with movie tickets, special date night memento's, prom night flowers, jewelery or smaller baby items. 

If you can't find this type of box, what you can do is head to the dollar store and pick up a wooden picture frame. Take the picture frame to GW (Goodwill) and find a box that will fit your picture frame. You will have to purchase small hinges as well to attach your picture frame to the top of the box. But you could achieve the same Shabby Chic Treasure Box by creating one from these separate items. 

Happy Crafting today :) 

Adorable Glass Beaded Candle Holder

This adorable glass beaded candle holder was made by using a clear glass. Purchased at GW for 25 cents.
I had the glass beads in my studio. I think I purchased the whole bag at my local craft store for under $5.00


To create on of these adorable glass beaded candle holders. You will need a clear drinking glass, glass beads, glue gun and some time. 
Here is the reason for the glass beads.


The flickering of the candle shines right through the glass beads at night time. 


My glass drinking cup was large enough to drop a small glass candle inside. This way I don't have to mess with removing candle wax when the candle has burned all the way down. But if you opt not to slip in a smaller candle. Make sure you spray inside your glass, a thin layer of cooking spray (not the butter type) this will help remove the wax from the candle when the candle has burned to the bottom of the glass. 

I started in the center of the glass drinking cup and worked my way up and and around. You must use a very hot  glue gun for this project or opt to use glass glue. Other wise your beads will start to fall off.  I did not cover the base of my glass as you can see, because I wanted to be able to carry it and not have to wrap my hand around the beads.

This would make a wonderful gift to give to someone, or perhaps yourself...
You may use this project for yourself, but not for resale. 

Oh so Shabby Chic

Have you ever seen those oh so Shabby Chic looks and thought, hum, wonder if I can do something like that. 
Well, I am going to teach you.  With one of my own tutorials  will help you find your inner Shabby Chic.

By now, if you have been reading along I don't buy retail to do any of my crafts. This is the same for this craft as well. I am not advertising for anyone, but the best deals I have found to date are at my local Goodwill. If you see (GW) mentioned, this is what I am speaking of.  I shop GW because it saves me a ton of money on my craft projects and if by chance I mess a craft up, well then, I am not out that much money.. 

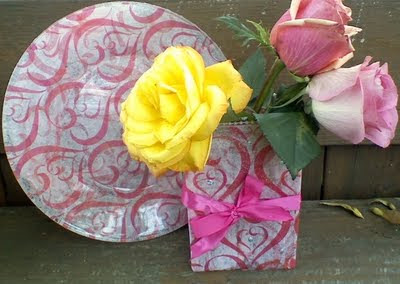
Shabby Chic Plate and Vase. 

Have you seen this print prior ? If you visit any Victoria Secrets and were handed the adorable little bag upon check out, this tissue paper was inside your bag. Waste not, the bow, is from the handles of the bag as well. 

For the longest time I have wanted to try creating something that has my own signature style. I think I have accomplished this goal.. The beautiful roses, were given to me Mother's Day by my son; David. :)

Lets start this project:
Supply List:
One clear glass plate any size, One clear glass vase any size
Mod Podge
Scissors 
Tissue Paper
Hot Glue
Finger Nail Polish
Beads
Ribbon
Paint Brush, any size
                                                              Container for Mod Podge


You will want to flip your plate over, to the back side. Apply a thin layer of mod podge


I think I got mine just a little too thick, so no need to put this much on, just a thin layer will do.

Add your Tissue paper, tear off small amounts or larger pieces if you would like. Keep doing this until your entire (back side of your plate is covered in tissue paper. Allow to  air dry and add another layer of Mod Podge over the tissue paper, allow to air dry.


Allow to dry over night... She is a beauty, is she not.
Total cost for this project $2.50 (I keep Mod Podge on hand)
If you want this same tissue paper, visit your local Victoria Secrets and ask if you can have just a few pieces of there signature tissue paper. Normally, if you shop at GW, you might be able to find some Mod Podge there or at your local craft store for under $5.99 for a small bottle.

I did the same thing for the clear glass vase as shown

Do you see the silver dots on the vase, created with silver finger nail polish.
I had the string of little pearls here in my studio, but you can opt not to use these. If you do, run a small bead of hot glue, lay the tiny pearls on, then another small line of hot glue. Do this until you have run the entire length of the opening. Hot glue dries very fast and you want your pearls or beads to adhere to the top of your vase.
If you have clear sparkle finger nail polish, you can use this to go over each outline of the hearts. This is what I did to give a more Shabby Chic appearance.

Plain Vase with Roses


Oh so Shabby Chic after..

Once you do one of these, you will probably want to do another one.. Yes, Mod Podge can be very addicting once you find that special tissue paper, craft paper, or news print.

GW does receive new items in every other day from major retail stores. So if you see a gray ticket hanging off of any item, this is an item that has been donated from a major retail store. Some of the major retail stores that donate to GW are as follows:

Bed Bath and Beyond
Sears
JoAnn Fabric
Khol's
Target
Plus a list of 30 other major retail stores.

You can find cheap finger nail polish for $1.00 at your local Dollar General store, close by the make up section. If you opt to shop there, as well they do have cheap paint brushes.

Happy Crafting today

Wednesday, May 11, 2011

Making T-Shirt Prints

Have you seen some of those very costly t-shirts that you would love to have 10 of, but the cost per each is out of your budget.. why not make your own adorable t-shirts at home with the use of just 7 items.

Supply List:

T-shirts (all white cotton is the best to use for this project) 
Fabric
Sewing machine
Crafter's Photo Fabric
Ink Jet Printer  
Tape and craft paper
Computer 


I had never used "Crafter's Photo Fabric" which you can pick up at Joann Fabrics. But as with anything new I purchase, it's trial and error before I post to my blog all the "what if's" and iron out all the errors.
I must say, this stuff is AWESOME.. not only can you use this in your printer, but you can as well print, peel and sew as the package states. 

(I used craft paper and tape to hold down the photo fabric, prior to sending it through my printer.)

The idea's are endless with Photo Fabric... 

What I did was go to my Microsoft word and type out what I wanted on my Photo Fabric, then I as well added the little stork. I wanted my design to be black and white, but you can do color ink as well on your printer. 


After you have printed out your own design, have the font you would like to use and have are ready to print.  Click print image from your own computer, this is where you can select black and white ink, or color or both. Print out your design, allow your design to dry for 15 minutes, peel paper backing away. Rinse for 30 seconds under running water, or until the water runs clear. Place wet photo fabric on a towel to dry and blot with towel, if needed iron out the wrinkles on your photo fabric. 

I clipped out a piece of fabric (smaller then the photo fabric image) and then centered it under the fabric (shown in the picture above) 
Take out your sewing machine and do a zig zag stitch inside the photo fabric and then outside along the edge of your selected fabric. 

If you wanted to, you could use your photo fabric for images of your children, vacation pictures, add words, changed the fonts, do all sort of creative things with your photo fabric. (just make sure to follow the standard instructions which are provided) 

If you would like to be very savvy, you could use photo fabric to create a very unique pillow, blanket, purse and more.. the idea's are endless. 


If you need a bunch of white t-shirts, head to your local goodwill store and pick up some on half day off. I have a feeling, once you start this project you will be using photo fabric on many things..


                                I made all of these in just a couple of hours as Gifts last year for those who I knew had new babies. They are really cute laid out in a white box with tissue paper and a small gift card.


Happy Crafting 

A little Bird watching and Bird House Craft

Our local library has a room in which they sell used books for a fraction of the retail price. I love to stop in there as I never know what I will find. The other day, found this Complete Illustrated Encyclopedia of the North American Birds. The original cost for this book was $49.99. I was able to snag this book for $1.50 


Little Anthony, he is all about Birds in our back yard, watching them and trying to sneak up on any bird to see if he can capture the bird.. Thank goodness the birds in our backyard are really quick. We don't need a bird as a pet around here.. 

Seeing this book made me think of Bird Houses.. 
I had found this wooden bird house at our local Goodwill store and picked it up for $1.50 (it was half price day when I shopped that day)  I never know what goodies I will find at our local GW.. it's a bargain paradise. 


Unfinished Bird House.. I could do many things with this bird house, but I wanted to do something really unique. I have tons and tons of scrap fabric. My fabric scraps have there own drawer, nicely folded and separated by colors and then styles of fabric. I keep adding to the drawer as well.. 

Thinking... thinking... Bird House.. Fabric Scraps... equals...


If you would like to create a unique bird house with fabric scraps.. here is how

Supply list: 
Wooden Bird House, any size will do. Make sure your bird house has a teared roof. (as mine above did) 
Spray Paint, any color your heart desires
Craft Paint
Mod Podge
Paint Brush, one flat and one round sponge 
Fabric Scraps in different sizes, colors. 
Small container for mod podge and fabric paint
Nail, hammer, or wire for hanging up in a tree

Paint your bird house using the spray paint you have selected, allow to dry for a few hours.. 
Next you are going to take your craft paint and round sponge, and slightly dip your round sponge into your craft paint, then you are going to lightly go over the front and rear of your bird house with the round sponge.
(do you see the light pink round sponge paint on the front of my bird house) look closer.. 
Allow this paint to dry really well.. You will be handling your bird house after this step a lot, so you want to make sure your paint is very dry.. 

Next, once your bird house is dry... get out your mod podge and using a small container pour or squeeze your mod podge into the container. I like to mix mine with just a few drops of water, stir up and began to lay your fabric across the top of the bird house. (you want to work from top to bottom)  adding each fabric one at a time. Paint mod podge on the wooden bird house, under your fabric as you go. This will help secure your fabric to the wooden bird house.  When you come to a corner or edge, simply trim your fabric back and then tuck under the over hangs of the bird house, using your mod podge first then tuck your fabric. Keep doing this until your entire bird house is covered with your fabric scraps. Once you are satisfied with the fabric on your bird house. Allow your bird house to dry. I sat this bird house out in the sun for a few hours.. it doesn't take long to dry outside. ( Speaking of outside, you are going to want to do this project outside or in a well ventilated area because of the spray paint fumes and paint fumes as well as the fumes from the mod podge) 

Once your bird house is dry, you are going to top coat your bird house all over with another layer of mod podge. Don't worry.. mod podge dries clear.. and leaves a nice shinny coat. 

(My bird house didn't have a long wooden rod at the top, so I took off the wooden rod and replaced it with another one I had here in my studio)  If you would like your bird house on a wooden poll, you can use a thick 2 or 3 inch dowel rod and strong glue to hold into place at the bottom. 


Enjoy the birds as they flock to your own bird house... 


Tuesday, May 10, 2011

A small Child's Flower Garden

I ran into a bunch of these plastic containers at the local thrift store. I got them on sale for just .20 cents each.

I think I had some that I use to keep my shoes in and old Christmas cards.  These are the smaller plastic containers.

This is a super great project if you have smaller children at home and you would like to have them do something fun and rewarding.. 

I ran into these box of flowers at Walgreen's for just a buck.. Later I saw the same box at another store for a much higher price.. So I picked up a few boxes for this project.

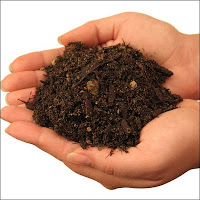
A small bag of potting soil for this project is needed as well.. 

This is my little helper for the day, my youngest son; Anthony.. Yes, he has a temporary tattoo on the side of his face ( I think it was left over from a Christmas Craft) but don't tell him.. 

Have your child fill up the small container with the potting soil, about half way up. 


Add your box of seeds. I used about 1/4 of the box and then put more potting soil over the seeds.


Soak with cold water all the way through so your soil is wet. 


Now we wait 10 days to see how these flowers turn out.. if all goes well, we will have 3 plastic containers of beautiful summer flowers.. which I will transfer to this newly spray painted container..

Saving this tutorial for another time.. I did pick this beauty up curb side shopping, but it didn't start out looking like this.. 

I will transfer the flowers we planted today into this yellow flower container.. This is a super fun project for kids and it's very inexpensive to do. I think I spent a total of $6.00 to do this whole project and Anthony can't wait until the flowers start to bloom :)

Curb Side Shopping, is another name for....

Curb Side Shopping... Oh the days of hearing the rolling laughter from the back seat of the SUV.. Giggles were all over the car and the memories, priceless. Fast forward today, I now have a teenager at home and the last thing she would like to do is curb side shop.. It's so embarrassing "MOTHER".. I might run into someone I know, my daughter tells me... !!

I have taken almost all of my 7 children with me curb side shopping.. Oh the treasures one can find. 
Here is some pictures of last years finds..


Super nice metal table, just needed a new paint job.
Super Nice wooden table, just needed new stain.

For those who do not know, "Curb Side Shopping" is where you find hidden treasures and things other people dis-guard by the road side.. Unwanted, no longer needed and just waiting to be picked up and taken home.  

I found this chair last year.. unreal someone would just toss out a wooden chair by the road.. This ended up sanded and a new fresh coat of stain was given to this chair.

I have a huge collection now of these big heavy duty flower pots. I spray painted this one white then touched it back up with sky blue. It's still sitting on my front porch. 

With each piece I collect by "Curb Side Shopping" I feel like I am helping my community by keeping these treasures from ending up in our landfills. Some of the items have no business just being burned. 

6 Chairs found by the side of the road. I washed and cleaned them up and gave each one a new coat of paint. These are the heavy duty chairs that can lay all the way back/down. I don't even think they actually make these types of lawn chairs anymore.. But there was no way I was going to allow all of these chairs to go to our local landfill.. 

Why would anyone toss this out by the curb.. my heavens. I just provided this little beauty with new stain and it's ready for a new home ..

Most of the items I collected last year, found new homes to go to. We had one massive giveaway day here and then found a local family that needed a few items. 

I saved these items from our local landfill.. When I leave it's dark, it's with a truck and I don't return home until the truck is full.. My husband, well, he gets very excited to see all the treasures I have found. We unload each piece off the truck and haul it to the back yard.. The next morning, I am up early washing, cleaning and scrubbing away all the pieces. 

Have you ever picked up anything by the curb in your area? If so, I would really like to know what you picked up, what you did with what you picked up. 

Saturday, May 7, 2011

Mothers Day Gift

We all want to provide a little something to our darling mother's, sisters, daughters, g-friends, co-workers for Mother's Day. Here is a little something that is very thoughtful to give and the children and grand children can help make each one.

First you are going to need a tall drinking mug, pick one out that is really cute and speaks volumes of Shabby Chic or something in a phrase that has special meaning.

 These mugs are simply beautiful !

Next on the list, potting soil. 
Make sure your potting soil is good quality. 

Next on the list, some really beautiful flowers of a mix variety. 


 Select a 4 of each flower to place into your coffee mug. 
So if you are doing several mugs, make sure you have enough flowers of each to go into his mug.


Add a bow to the handle, a little painted wooden flower and you have a super wonderful Mother's day gift that will bloom all summer long. (you can opt to use a basket, just make sure you cut some clear plastic to fit inside the basket prior to filling with your potting soil. This will ensure that the basket does not grow mold when watered. 


I had so much fun making these little flower pots. Get very creative in your selection of mugs, flowers and accessories you can add to your potted flower mug :) 

Here is just a very cute little pot I found that was just calling yellow flowers. The heart in the back ground is all wood and painted with some paint by hand, then a wooden rod is placed up inside the heart. 

Here is another tall mug I found, I just loved the little yellow chickens on the front and all the colored flowers. 

You can find mugs online, tag sales, thrift stores or even garage sales. Always be on the look out for the taller decorative mugs and grab a few to keep on hand. 

You can grab a few wooden hearts here in different sizes. 

If you run out of paint, or don't have any paint on hand to paint your heart.. Don't worry. I have a very good secret tip. (you can use your finger nail polish) just pour some out in a little plastic cup and grab a brush and start painting.  If you have paint on hand, spray paint your heart on one side, light pink or white, allow to almost dry, to where the paint on the heart is tacky.. and then use your finger nail polish to swirl into the spray paint.  This trick is what I used to create my Shabby Chic hearts that you see in the photo's above. Allow then to fully dry. Spray paint the other side of your heart and do the exact same as you did on the other side. 

Have fun creating your wonderful Shabby Chic Mugs.. 

These would make a super wonderful gift to give to any new mommy who is expecting, birthday's, baby showers.. the list is endless. You could even hang a package of new seeds off the wooden flower as well with a ribbon. 

Have fun crafting up your own Shabby Chic Flower Pot Mug :) 
Related Posts Plugin for WordPress, Blogger...