Showing posts with label sewing. Show all posts

Thursday, May 12, 2011

Vintage Apron in a Snap

Tag sales are great to shop around for Vintage pieces. I found this adorable single panel curtain for just a few dollars. I love shopping around for really unique pieces. It's my hidden addiction,  shhh, don't tell anyone. 


I am going to assume it was for a kitchen window, but I fell in love with all the flowers at the bottom. I just knew I had to have this and turn it into something really cute. 


Sorry for the blur.. my camera would not cooperate with me today. I folded the curtain in half and cut the top half off, leaving just the bottom half.


I added a one inch seam at the top part that was raw, and folded this over to make a nice seam. Leaving the ends open, so I can slide in ribbon on both sides.  Ops, did I mention I don't use straight pins when I sew. I eye ball everything when I sew. At this step, if you use straight pins, dig them out and use them. 


Isn't the piping trim along the bottom so adorable. So vintage, good thing I had ribbon that would match inside my studio. If not, white ribbon would of worked just as well. 


Ta Da.. a  Vintage Apron in a snap... So adorable. The ribbon that I used matched the trim along the bottom. Perfect match and this Vintage Apron turned out really adorable.  You could add a pocket if you wanted with the top piece that you cut off, I can still add the pocket if I want, which I might just do.. 
My wire dress form is leaning on me because of the yard.. I got this dress form for a super bargain as well.. for FREE.. Maybe she needs a new paint job... hum, well perhaps another day :)


I was at another tag sale last year and found a 5 gallon tote full of ribbon. I am not sure why anyone  didn't purchased all this ribbon,  but I was able to talk the man into selling me all the ribbon inside the 5 gallon tote plus the tote container for $5.00. Never hurts to ask... I donated about 200 spools and kept about 150 spools for myself.. all brand new might I add. 

This apron would make a very cute gift to give to anyone who just moved into a new house, or a hostess gift with a bottle of wine and a home made card. Or a birthday gift with a ribbon bow. 


While at the local Bakery, never be afraid to ask if you can purchase a single bakery box. 

Happy sewing and crafting today :) 

Wednesday, May 11, 2011

Making T-Shirt Prints

Have you seen some of those very costly t-shirts that you would love to have 10 of, but the cost per each is out of your budget.. why not make your own adorable t-shirts at home with the use of just 7 items.

Supply List:

T-shirts (all white cotton is the best to use for this project) 
Fabric
Sewing machine
Crafter's Photo Fabric
Ink Jet Printer  
Tape and craft paper
Computer 


I had never used "Crafter's Photo Fabric" which you can pick up at Joann Fabrics. But as with anything new I purchase, it's trial and error before I post to my blog all the "what if's" and iron out all the errors.
I must say, this stuff is AWESOME.. not only can you use this in your printer, but you can as well print, peel and sew as the package states. 

(I used craft paper and tape to hold down the photo fabric, prior to sending it through my printer.)

The idea's are endless with Photo Fabric... 

What I did was go to my Microsoft word and type out what I wanted on my Photo Fabric, then I as well added the little stork. I wanted my design to be black and white, but you can do color ink as well on your printer. 


After you have printed out your own design, have the font you would like to use and have are ready to print.  Click print image from your own computer, this is where you can select black and white ink, or color or both. Print out your design, allow your design to dry for 15 minutes, peel paper backing away. Rinse for 30 seconds under running water, or until the water runs clear. Place wet photo fabric on a towel to dry and blot with towel, if needed iron out the wrinkles on your photo fabric. 

I clipped out a piece of fabric (smaller then the photo fabric image) and then centered it under the fabric (shown in the picture above) 
Take out your sewing machine and do a zig zag stitch inside the photo fabric and then outside along the edge of your selected fabric. 

If you wanted to, you could use your photo fabric for images of your children, vacation pictures, add words, changed the fonts, do all sort of creative things with your photo fabric. (just make sure to follow the standard instructions which are provided) 

If you would like to be very savvy, you could use photo fabric to create a very unique pillow, blanket, purse and more.. the idea's are endless. 


If you need a bunch of white t-shirts, head to your local goodwill store and pick up some on half day off. I have a feeling, once you start this project you will be using photo fabric on many things..


                                I made all of these in just a couple of hours as Gifts last year for those who I knew had new babies. They are really cute laid out in a white box with tissue paper and a small gift card.


Happy Crafting 

Saturday, May 7, 2011

Mothers Day Gift

We all want to provide a little something to our darling mother's, sisters, daughters, g-friends, co-workers for Mother's Day. Here is a little something that is very thoughtful to give and the children and grand children can help make each one.

First you are going to need a tall drinking mug, pick one out that is really cute and speaks volumes of Shabby Chic or something in a phrase that has special meaning.

 These mugs are simply beautiful !

Next on the list, potting soil. 
Make sure your potting soil is good quality. 

Next on the list, some really beautiful flowers of a mix variety. 


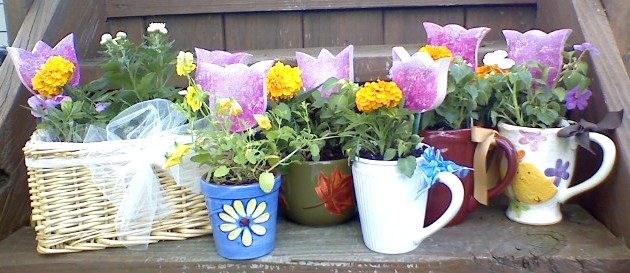
 Select a 4 of each flower to place into your coffee mug. 
So if you are doing several mugs, make sure you have enough flowers of each to go into his mug.


Add a bow to the handle, a little painted wooden flower and you have a super wonderful Mother's day gift that will bloom all summer long. (you can opt to use a basket, just make sure you cut some clear plastic to fit inside the basket prior to filling with your potting soil. This will ensure that the basket does not grow mold when watered. 


I had so much fun making these little flower pots. Get very creative in your selection of mugs, flowers and accessories you can add to your potted flower mug :) 

Here is just a very cute little pot I found that was just calling yellow flowers. The heart in the back ground is all wood and painted with some paint by hand, then a wooden rod is placed up inside the heart. 

Here is another tall mug I found, I just loved the little yellow chickens on the front and all the colored flowers. 

You can find mugs online, tag sales, thrift stores or even garage sales. Always be on the look out for the taller decorative mugs and grab a few to keep on hand. 

You can grab a few wooden hearts here in different sizes. 

If you run out of paint, or don't have any paint on hand to paint your heart.. Don't worry. I have a very good secret tip. (you can use your finger nail polish) just pour some out in a little plastic cup and grab a brush and start painting.  If you have paint on hand, spray paint your heart on one side, light pink or white, allow to almost dry, to where the paint on the heart is tacky.. and then use your finger nail polish to swirl into the spray paint.  This trick is what I used to create my Shabby Chic hearts that you see in the photo's above. Allow then to fully dry. Spray paint the other side of your heart and do the exact same as you did on the other side. 

Have fun creating your wonderful Shabby Chic Mugs.. 

These would make a super wonderful gift to give to any new mommy who is expecting, birthday's, baby showers.. the list is endless. You could even hang a package of new seeds off the wooden flower as well with a ribbon. 

Have fun crafting up your own Shabby Chic Flower Pot Mug :) 

Monday, April 11, 2011

Creating Felt Food for your little one.

Felt Cup Cake; Yum 

Felt Food Wonders

When I was scouting online for play food to create for my little boy. I came across a cup cake that I thought I could make.
At first I was not real sure how to go about doing this.

As it turns out, I ended up sewing a strawberry with green top out of felt to add to the cup cake. 

Since my little boy is allergic to so many foods & is autistic, being able to play with these felt foods is really awesome for him. 

I hope you enjoy my pictures.


Bow Tie Pasta

Felt Cup Cake


Bow Tie Pasta 

Yum, bow tie pasta that he can play with and move around on the plate. 

I made this pasta with felt as well and in different colors. His favorite color is green, so green bow tie pasta was a must to make for him along with white and red bow tie pasta. 


Another Cute Cup Cake 

The final cup cake I made is red felt mixed in with black felt. With red top and white top. 

The ribbon along the bottom makes it the cup cake appear that it is sitting inside a little cup cake holder. 

I can just see a set of 3 of these inside a white bakery box with bow for a little boy or girl to play with for pretend baking and playing. 

Felt Ice Cream Cone 
I know my little boy has really enjoyed playing with the felt food today :)

Wednesday, April 6, 2011

My Studio / Office and all my Fabrics

My first Brother sewing machine 

 Retired Sears Sewing machine 
New Brothers sewing machine, see the blue butterfly 
I love this big bolt of fabric that I purchased. 
It's a super great fabric to work with. 
 I work with over 9000 fabrics daily
 Ops, I just noticed I left on my sewing machine light
New Fabrics that just arrived, I so love the colors !


Bolts, containers, stacks... I am addicted to fabrics.


What does your office look like ?


Sunday, May 16, 2010

The feel of cotton

Years ago when I first started to learn to sew I had just a small amount of fabric on hand. The textures the patterns and the designs kept me hooked on buying more.

I enjoy shopping for fabrics of all kinds and have a whole office full to show for my love and feel of cotton fabrics. It's having these wonderful fabrics at my fingertips that allows me to touch and envision something I can create that no one else has. It's putting pieces of fabric together to create something new, something made out of love, something someone else can use.

Fabric comes in all sizes, designs as well as textures. There is 100% cotton, organic cotton, fleece, soft cuddle minky, chenille, woven, and the list goes on and on.

It is recommended that before you start a new project that involves fabric that you wash your piece first. So read those labels on the side bolt of how to wash your fabric first prior to starting any sewing project.

Let me know of anything new you started to sew or your own love for fabrics. I would love to hear from you.

Saturday, May 1, 2010

Letting it out and learning to sew

It was not too long ago that I didn’t even know how to sew now here it is years later and the idea of sewing and crafting up new items has become a true passion.

I find sewing is very relaxing for myself and my world for just a few hours a day. Life has been a true
journey since my little guy was born in 2004. I have traveled down a road of the true unknown and I am
very thankful for computers, as the knowledge along the road has been so helpful. 

My little guy stopped eating at 17 months, I ran from doctor to doctor trying to find out what in the world
was going on, worried and almost in tears, I would be told; “honey it’s just a phase” all kids go through
this. I was not a new mommy, I was a seasoned mommy and I knew something was not right. I bounced
from one doctor after another tying to receive help. 

Since then I have fought to find out what is wrong if anything with my little boy.  My husband purchased a sewing machine for me, thinking that I knew how to sew, but the sewing machine sat in the closet for almost half a year before I dusted it off and turned it on for the first time. I still to this day can’t follow a pattern, but what I have created and the products that I have sewn have been a blessing to me, and to those who purchase these items. Sewing and my other (old blog) that was deleted by mistake were like therapy to me. I would sew and sew to let out the stress of not understanding what my little boy was going through, his daily struggles.

I hope you will return and become a guest of my blog and visit here often as I start this new blog
and a new journey on to now knowing that our little guy is autistic.
Related Posts Plugin for WordPress, Blogger...